New Search

If you are not happy with the results below please do another search

9 search results for: nabhi

1

Terrific Yoga Cobra Pose for Healthy Back & More

Kundalini Yoga Cobra Pose for Healthy Back

Hatha Yoga Posture for Healthy Back and Digestion 

Kundalini yoga’s terrific cobra pose is the next entry in our Free Online Illustrated Kundalini Yoga Poses and Exercises E-Book.  Here I would like to mention that Kundalini Yoga, as you can see, incorporates the postures and exercises from other types of yoga as well.  Specially hatha yoga.  In this way, Kundalini Yoga is like a superset of yoga poses and exercises and so is sometimes referred to as the Mother of all Yogas.

For those keen on Hatha yoga poses only, I will be creating a separate e-book which will tease out those poses that are traditionally considered part of Hatha yoga and which form the basis of many other types of yoga practice.

Cobra PoseCobra pose is one of those nice yoga postures, which is easy to do and bestows many, many important health benefits.  It is not only great for the health and flexibility of your back and spine, but is also excellent for regulating your digestive system and toning other abdominal organs.  Full benefits of this pose are listed below the illustrations in the practice instructions section.

From a chakra point of view, cobra pose works on your sex (swadhisthan), navel (nabhi), heart (anahata) and throat (vishuddhi) chakras.  That list should give you a good indication of how helpful this pose really is, as it works on four of the seven important chakras.

Below you will find two illustrations of cobra pose. In this case you can use either pose.  The first illustration shows cobra pose being done with straighter arms, while in the second the elbows are bent.  Either way, the benefits are very similar and you are welcome to pick either or do either from time to time.

Cobra pose can also be done with the eyes open or closed.  With eyes open, one should look up as that also helps tone the optical nerve and is beneficial for your eyes and vision.

Yoga Cobra Pose for Healthy Back

Picture of Kundalini Yoga Cobra Pose w/ Straight Elbows


Picture of Kundalini Yoga Cobra Pose  w/ Bent Elbows

Kundalini Yoga Cobra Pose Practice Details:

a. Step-by-Step Instructions for Kundalini Yoga Cobra Pose:

  • Lie flat on the floor, stomach down and feet extended.
  • Place your hands near your shoulders and then raise your upper body and torso up off the ground.  The upper thighs should remain on the floor.  You back should arch up.
  • Turn your head up and look upwards as well.  Stretching your neck.
  • You can either do Long Deep Breathing or do the Breath of Fire Breathing Exercise.
  • As a variation, you can go up and down in cobra pose.  Coming up and breathing in, holding the position for a few seconds and then coming back down and exhaling.

b. Duration for Kundalini Yoga Cobra Pose:

  • 15 Seconds – 7 minutes.
  • Start slowly and build up your time steadily from there.

c. Benefits of Kundalini Yoga Cobra Pose:

  • Very good for improving the health of the back and spine.  Good for toning all the back muscles and tissue related to the vertebrae.
  • Massages all the digestive organs improving both digestion and elimination.  Works on balancing both the manipura (navel) chakra and the swadhisthan (sex) chakra.
  • Works on all the nerve junctions that lie along the spine, as well as the important psychic channels that run through the spinal cord.
  • Works on improving functions of the ovaries and reproductive glands.
  • Works on the thyroid and para thyroid glands and the vishuddhi (throat) chakra.
  • Opens up the heart chakra (anahata) promoting softness of character.
  • Good for improving vision and toning the optical nerve.
  • Builds upper body strength.  Specially the shoulders (deltoids), triceps and chest (pectoral) muscles.  This is more true if you use the modified version of cobra pose where you go up and down.


d. Practice Tips for Kundalini Yoga Cobra Pose:

  • Careful with your lower back!  Do not over strain.
  • Also, careful with the elbows if you are using the bent arm version.
  • Going up and down in cobra pose is excellent for building strong arms, shoulders and chest muscles without risking injury.

Online Kundalini Yoga Kriyas Using Cobra Pose:

(Coming Soon).

2

Illustrated Kundalini Yoga Stretch Pose for Core Abdominal Power

Summary: The famous Kundalini Yoga Stretch Pose is detailed and illustrated in this first entry in the new Free Online Illustrated Kundalini Yoga Poses & Exercises E-Book.  Pictures of both, the normal pose and beginner version of this yoga posture are provided, along with practice details, benefits, tips and instructions.

Yoga Pose Core Abdominal Power

Illustrated Kundalini Yoga Pose #1 

The very first kundalini yoga pose from the Free Online Illustrated Kundalini Yoga Poses & Exercises E-Book will be the powerful Stretch Pose.  This yoga pose is a frequent entry in many Kundalini Yoga kriyas, especially those that deal with opening, healing and balancing the important navel chakra, the third chakra of the kundalini yoga seven chakra system responsible for your abdominal region.

Yoga Stretch

Early in your kundalini yoga practice, it is important to focus on the abdominal area.  This is because strengthening your navel center will, not only give you important core energy to develop your yoga practice, but will also help build your character and willpower, which are essential for a long term consistent, fruitful practice.

Below, you will find 2 illustrations of kundalini yoga stretch pose, the first is the normal pose, and it is followed by an illustration of the modified version of stretch pose.  You can also switch back and forth between the two poses, as you develop your abdominal strength.  Below that are practice details and instructions for this most important kundalini yoga exercise.  Also, provided are the online Kundalini Yoga Kriyas which use this posture.


Kundalini Yoga Stretch Pose Video

Direct Link to YouTube Video –> Best Yoga Exercise for Core Power

Picture of Kundalini Yoga Stretch Pose

free illustrated kundalini yoga pose for core abdominal power


Picture of Beginner Kundalini Yoga Stretch Pose

free illustrated beginner kundalini yoga pose for core abdominal power

Kundalini Yoga Stretch Pose Practice Details:

a. Instructions for Kundalini Yoga Stretch Pose:

  • Lie on your back.
  • Place your hands under your buttocks palms facing down (to support your lower back).
  • Raise your heels 6 inches, point your feet and toes away from you, raise your head slightly and stare at your toes.  You will feel the abdominal muscles go to work immediately.
  • Begin Breath of Fire Breathing Exercise.

b. Duration for Kundalini Yoga Stretch Pose: 15 seconds -11 minutes.

c. Benefits of Kundalini Yoga Stretch Pose:

  • Builds abdominal strength.
  • Increases core energy and power.
  • Helps develop the much coveted 6 pack abs.
  • Opens, heals and balances the Manipura Chakra (aka. Nabhi Chakra, Navel Chakra, Solar Plexus Chakra) which is the seat of willpower.  It is recommended to build this center early in your Yoga practice as it will give you the strength and character to see things through.
  • Improves your digestive system.

d. Practice Tips for Kundalini Yoga Stretch Pose:

  • To modify this pose you can do this posture with your legs bent at the knees, or do one leg at a time.  Either way you will reduce the pressure on the abdominal muscles.
  • Be careful with your lower back when practicing this pose, roll more of your arms underneath you to help give it more support.

Online Kundalini Yoga Kriyas Using Stretch Pose: 

  1. Kundalini Yoga Morning Wake-up Series: Excellent quick kundalini yoga set for an overall workout.
3

Prosperity & Infinite Energy Meditation Technique – Free Guided Meditation Book for Daily Practice – Ch 5

Wealth & Prosperity Meditation Technique

Free Meditation & Kundalini Yoga Mudras for Prosperity

Prosperity Meditation Guided Video

(From Free Online Meditation Videos, chapter 4 Prosperity Mudra Mantra Meditation Video)

1


Background of Prosperity Meditation Technique:

Prosperity & Infinite Energy

Recently I have received many requests to provide a meditation technique for prosperity and wealth.  The guided meditation technique in this article not only meets that requirement, but in fact does a great deal more for you as well.  My views on money on the path to enlightenment and views on how to choose and manifest your desires, can be read in the following 2 articles: Money Money Money Mantra and the Path to Enlightenment and The 4 Keys Laws to Manifest Desire if You Absolutely Must.  If you feel money and wealth are indeed needed by you at this time of your life, then by all means use this potent meditation technique to manifest them.

This powerful meditation technique utilizes many different components of Kundalini Yoga and Yoga Philosophy to work its magic.  It uses the power of mantra (sound/thought vibration), yoga mudras (hand positions to facilitate certain states of consciousness), pranayama (breath control techniques), in conjunction with yogic body techniques to fulfill its purpose.  Thus, this unique meditation can also be categorized as a Kundalini Yoga Kriya (set) or a Yoga Breathing Exercise (pranayama).

Tools required for Prosperity Meditation Technique:

  • An alarm clock, stop watch or other time device.

Benefits of Prosperity Meditation Technique:

Primary Benefits: 

  • Attracts and brings to you prosperity, wealth and money.
  • Makes available to you the Energy of the Infinite.  Please use wisely.
  • Attracts and brings to you gifts and blessings.
  • Expands and strengthens your Pranic (energetic) body.
  • Expands and strengthens your nervous system.
  • Helps you overcome deep seated fears (including fear of death) and makes you courageous.
  • Builds the Naval Center and abdominal muscles.

Secondary Benefits: 

  • Opens, heals and rejuvenates the Manipura (Nabhi – Naval) Chakra.
  • Improves your digestive system.
  • Builds your willpower and strength of character.

Cautions for Practicing Prosperity Meditation Technique:

As mentioned above, this meditation technique utilizes breath control (pranayama) as part of its process.  It requires breath suspension after exhalation, which is one of the more difficult aspects of breath control.  Anytime you are going to practice breath suspension, especially after exhalation, you need to move forward gently and intelligently.  So Do Not Strain and build up the time for this meditation systematically.  In doing so you will avoid creating unnecessary problems for yourself and will gracefully gain mastery over this profound meditation technique.

Guided Prosperity Meditation Technique: 

Follow the step by step meditation instructions below to practice this technique.

  • Sit in a comfortable cross legged position.  You may also sit on a chair for this meditation.
  • Set your alarm or other time device for the appropriate time (start with 1 minute and build up to 11 minutes or more).
  • Elongate your spine upwards, lengthen your neck and subtly bring your chin back and in, like a soldier at attention.  This will align the spine with the back of your head.
  • Take 5 deep, slow breaths though the nose.  This will oxygenate your blood and relax you.
  • Place your LEFT hand in Yoga Gyan Mudra (your INDEX finger and Thumb tips are meeting, other 3 fingers are pointing straight)
  • Extend your left arm up at 60 degrees.  Your palm is facing in towards you and the arm should be straight.
  • Place your RIGHT hand in Yoga Surya Mudra (your RING finger and Thumb tips are meeting, other 3 finger are pointing straight)
  • Bend your right arm such that your right elbow is near your lower ribs, on the right side of your body, with your forearm making a small angle at your right elbow joint.  The right palm is also facing in (and will be about face level).
  • Close your eyes.
  • Inhale deeply, then EXHALE completely and hold your breath out.
  • With your breath held out pump your stomach at a moderate pace about 1 pump / second.  Pump your stomach means to pull in your abdominal muscles powerfully towards your spine.
  • With each pump silently THINK the sound HAR.
  • Once your have done as many pumps as you are comfortable doing, inhale deeply, then EXHALE and repeat the cycle again.  Continue for the duration of the meditation.

Hints & Tips for Prosperity Meditation Technique:

  • I repeat, start this meditation slowly and build up your time systematically.
  • When you start to feel stronger and more capable of holding your breath out for extended periods of time, challenge the sense of panic that comes upon you as a result of breath deprivation.  Staying calm through this period of panic will make you fearless.  DO NOT TRY THIS UNTIL YOU THINK YOU ARE READY FOR IT.
  • Try to keep the arms as indicated and don’t give up at the first sign of discomfort.  Again, don’t overdo it early in your practice, but as you progress let the mind and body know that you have the willpower and spirit to overcome their complaints.
  • This meditation is designed to give you a great deal of power, energy and wealth.  It is provided here with the understanding that you agree not to misuse any of these blessings and agree to use them to make progress on your spiritual journey and/or use them to help others in theirs.

This concludes the Prosperity & Energy Guided Meditation Technique.

(Added 08/30/2007) 

Here are some illustrations for the correct posture and yoga mudras (hand positions) for this meditation as I realize this meditation can be quite confusing.  Way over due I know :-P.


Infinite Energy & Prosperity Meditation

Right Hand Position  (Surya Mudra)

Left Hand Position (Gyan Mudra)

4

Gentle Yoga & Meditation Class Gets off to a Beautiful Start & a Picture !

Well folks Mastery of Meditation has finally gone Multi Media, yes I have at long last figured out and uploaded the very first image onto this website and I hope it is the first of many.  For those who have inquired, yes there is a plan to upload online videos as well in the not so distant future I hope.

The picture above is of our wonderful Gentle Yoga and Meditation Class that kicked off today.  I have a great deal of love and respect for my students and I am very grateful to them for making this class a reality.  The Silent Mind Meditation Center really belongs to them, I am just a guy who happens to teach there.

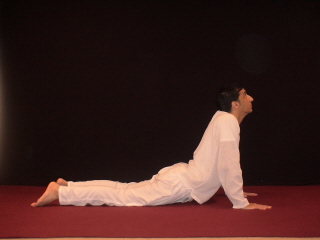
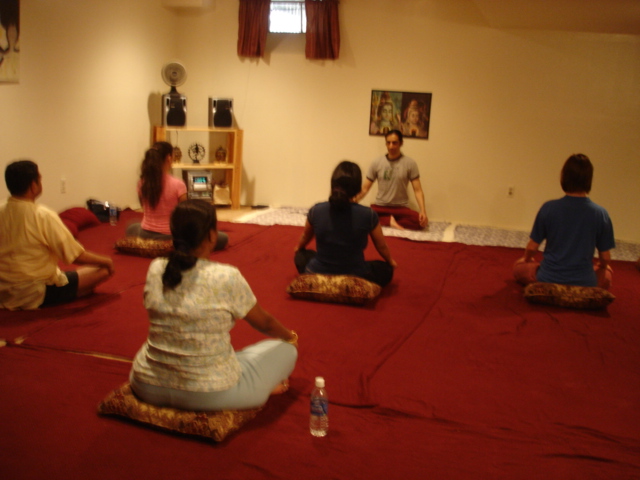
The first class really went well, although our meditation session was shorter than I would have liked as we ran out of time.  This was primarily because it was our first class and we gave students some extra time to arrive and settle in.  I have a good feeling about this class as I think it will give those interested in meditation and pranayama (breathing exercises) a good opportunity to learn, develop and deepen their practice.  In today’s class we learned several breathing techniques, such as Anuloma Viloma Pranayama and we also practiced Zen Meditation Technique (Zazen).  We also did a modified version of the Morning Wake-up Kundalini Yoga Exercises.

The Kundalini Yoga Class afterwards went well too and some students who took both classes found that the Gentle Yoga and Meditation class provided a perfect foundation and “warm-up” for the Kundalini Yoga Class.  In the Kundalini Class we continued to work on the Navel Center (Manipura/Nabhi Chakra) and introduced the powerful Kundalini Kriya, Sat Kriya.  I do plan on uploading Sat Kriya to the website as well.

There were many interesting questions today, in the question answer period we have after class.  I have taught many Kundalini Yoga classes, in many locations and privately as well, but this is the first time I have had such in-depth and wonderful discussion sessions after class.  In fact these satsang (group discussions on spiritual topics) sessions sometimes last over an hour!  I have to let other students, who may not be actively participating, know that they are not obligated to stay… but most seem to stick around.

Among the topics we discussed today were Ayurveda (Science of life – Ancient healing system of India), Yoga and vegetarianism, Donations and the Law of Karma.  The discussions on Ayurveda and diet included the role of Rajasic foods in one’s practice, along with discussions on Sattvic and Tamasic food groups.  The discussions on donations, included my view on teaching for free and my favorite law of Tantra “What ever comes let it come, what ever goes let it go.”  It was a great class and I look forward to many more.

5

Core Abdominal Power Yoga Exercises – Free Book of Kundalini Yoga Poses & Kriyas – Ch 3

Yoga Exercises for Core Abdominal Power

Free Yoga Poses for Navel Strength & Power

Kundalini Yoga Set #3


Video of Core Power Kundalini Yoga Set

(From Free Yoga Videos, yoga video #2, Yoga Workout for Ripped Abs)


1


Purpose of Core Abdominal Power Yoga Exercises:

The following set of Kundalini Yoga exercises builds the navel center and works on the 3rd Chakra (energy vortex) of the Kundalini Energy System.  The 3rd Chakra is called the Manipura or Nabhi Chakra.  The navel center is not only important for core energy and necessary physical fuel, but also the Manipura chakra, which governs this region, is associated with the attributes of willpower and strength of character.  Thus, it is recommended that early in one’s yoga practice one builds and balances this chakra.  Doing so helps one to remain committed to their yoga and meditation practice, thus reaping the full rewards that such practice brings.  Of course developing washboard like abs in the process does not harm either :-).

Core Abdominal Power

Description of Core Abdominal Power Yoga Exercises:

1. Single Leg Rotations Kundalini Yoga Exercise:  (Chkra Padasana)

a. Guided Instructions for Single Leg Rotations Kundalini Yoga Exercise:

  • Lie flat on your back.
  • Raise your right leg up to about 45 degrees.
  • Point your feet and toes away from you.
  • Begin the Breath of Fire Breathing Exercise and keeping your leg straight rotate it in a big circle clockwise.  Make the circle as big as you can without touching the floor.
  • Do 10 rotations in 1 direction and then without resting rotate the same leg in the other direction (counter-clockwise).
  • Repeat with the left leg.

b. Duration for Single Leg Rotations Kundalini Yoga Exercise: Takes about 1 minute / leg, but use the count provided above.

c. Benefits of Single Leg Rotations Kundalini Yoga Exercise:

  • Builds your Navel Center and strengthens and tones your abdominal muscles.
  • Activates and balances the Manipura Chakra (naval center)
  • Builds willpower and strength of character.
  • Loosens and opens up the hips. 

d. Practice Tips for Single Leg Rotations Kundalini Yoga Exercise:  To modify the exercise bend you knees or do fewer rotations at a stretch.  You can also take rest as needed.

(Take a short break to let your hip flexors and abdominals recover).  

2. Double Leg Rotation Kundalini Yoga Exercise:

a. Guided Instructions for Double Leg Rotations Kundalini Yoga Exercise:

  • Continue to lie flat on your back.
  • Now raise both legs up to about 45 degrees.
  • Point your feet and toes away from you.
  • Begin the Breath of Fire Breathing Exercise and keeping your legs straight rotate them in a big circle clockwise.  Make the circle as big as you can without touching the floor.
  • Do 10 rotations in 1 direction and then without resting rotate your legs in the other direction (counter-clockwise).

b. Duration for Double Leg Rotations Kundalini Yoga Exercise: Takes about 1 minute, but use the count provided above.

c. Benefits of Double Leg Rotations Kundalini Yoga Exercise:

  • Builds your Navel Center and strengthens and tones your abdominal muscles.
  • Activates and balances the Manipura Chakra.
  • Builds willpower and strength of character.
  • Loosens and opens up the hips. 

d. Practice Tips for Double Leg Rotations Kundalini Yoga Exercise:  To modify the exercise bend you knees or do fewer rotations at a stretch.  You can also take rest in between as needed.  To support your lower back you may want to put your hand underneath your buttocks with your palms facing down.

3. Relax in Yoga Corpse Pose: (also called Shav Asana)

a. Guided Instruction for Yoga Corpse Pose:

  • Lie on your back and have your arms out to your sides about six to twelve inches away from your body.
  • Turn your palms slightly upward.
  • Relax your body and breath.

b. Duration for Yoga Corpse Pose: 1-2 minutes.

c. Benefits of Yoga Corpse Pose:

  • Allows the body to consolidate the gains from the previous exercises.
  • Helps the body heal and rejuvenate itself.
  • Promotes relaxation and peace.

d. Practice Tips for Yoga Corpse Pose: Try to consciously relax your entire body.  Release all your tensions and worries and stay in the present moment as best you can.

4. Kundalini Yoga Abdominal Pop Corn Exercise:

a. Guided Instructions for Kundalini Yoga Abdominal Pop Corn Exercise: 

  • Lie on your back, bend your legs and bring you knees in towards your chest.
  • Hold on to each knee.  Right hand grasps right knee, and left hand grasps left knee.
  • Now try to explode off the ground like you are a pop corn popping.  So you are trying to launch your whole body towards the ceiling (you will probably not leave the ground, but its the effort that counts here :-)
  • If you are doing this right, pretty soon your abdominal muscles will let you know.

b. Duration for Kundalini Yoga Abdominal Pop Corn Exercise: 1-5 mins

c. Benefits of Kundalini Yoga Abdominal Pop Corn Exercise:  

  • Very good for building your core power and abdominal strength.
  • Good for building overall fitness and stamina.

d. Practice Tips for Kundalini Yoga Abdominal Pop Corn  Exercise: Another yoga exercise that you should not be quickly fooled by.  If doing it correctly it is a great way to burn fat and develop strong abdominal muscles without putting any strain on the joints and lower back.  Make sure you are using a soft surface when doing this exercise.

5. Yoga Boat Pose (Maha Shakti Kriya or Naukasana)

a. Guided Instructions for Yoga Boat Pose:

  • Lie flat on your back.
  • Have your arms straight out to the sides with your palms facing in. Keep your legs together and straight out as well with your toes pointing forward.
  • Now bring your legs and torso up such that you are balancing on your sacrum.  Keep your eyes focused on your toes, this will help you keep your balance.  You are forming a V shape, with your legs and torso.
  • Begin the Breath of Fire Breathing Exercise.

b. Duration for Yoga Boat Pose: 1-3 minutes

c. Benefits of Yoga Boat Pose:

  • Builds your Navel Center and strengthens and tones your abdominal muscles.
  • Activates and balances the Manipura Chakra.
  • Builds willpower and strength of character.
  • Awakens all the systems in the body (digestive, nervous, endocrine, circulatory, etc.).
  • Develops focus and balance. 

d. Practice Tips for Yoga Boat Pose: To modify the exercise hold on to your knees or thighs.  Keeping a steady gaze upon your toes will go a long way in helping you keep your balance.  If you need to, you can take a break and then come into the pose again once you are ready.  This is a very powerful kundalini yoga pose and is sometimes practiced on its own as a complete set (kriya).  You can build up the time for Maha Shakti Kriya to 11 minutes.

6. Relax in Yoga Corpse Pose (#3 above) for 2-5 minutes:

This concludes the Core Abdominal Power Yoga Exercises.

6

Yoga Positions for Beginners for Daily Morning Practice – Kundalini Yoga Morning Wakeup Series

Beginner Yoga Poses for Daily Morning Practice

Kundalini Kriya #2 – Yoga Morning Wakeup Exercises

The following beginner’s Kundalini Yoga Set is also described in this post (Morning Wakeup Kundalini Yoga Set), but I am including here as part of the Kundalini Yoga Kriyas Book for the sake of completeness and better organization.

Even though this set of yoga positions and exercises is simple for the beginner yogi to do, it is not any less valuable than many advanced Kundalini Yoga Kriyas.  It is an excellent yoga set with a wide range of great benefits.  In fact, it is a set which encompasses many of the daily recommendations of Kundalini Yoga.

Video of Kundalini Yoga Morning Wake-up Series

(From Free Yoga Videos, yoga video #3, Beginner Kundalini Yoga Exercise Video)


1

The Pranayama (breathing exercise) used for most of this set is the Breath of Fire, which is described in Breath Control & Yoga Pranayama Book – Breath of Fire Breathing Exercise – Ch 1.  Here is also a video demonstration of Breath of Fire Breathing Exercise to help make sure you doing it correctly.

Free Online Yoga Video of Breath of Fire


1

(From the Article: Breath of Fire Kundalini Yoga Pranayama Video)


Overview of Beginner’s Morning Wakeup Kundalini Yoga Exercises:

Yoga Positions

The yoga postures and exercises below, should be done in sequence without taking a break in between if possible.  The set can be done anytime of the day, although it is best done in the early morning hours.  Even though this set is designed for beginners, I still recommend reading the 10 Guidelines for Kundalini Yoga Practice post first before starting it. 

This set is ideal for beginning a Kundalini Yoga practice and done regularly can help form a very good foundation from which to progress to more advanced work.  It is also suitable for doing prior to a meditation session. 

In addition, this set has the advantage of not requiring much time so can be perfect for those with a busy schedule.  Overall, the set works on your respiratory, digestive, immune and nervous systems.

How To Do Beginner Morning Wakeup Kundalini Yoga Exercises:

1. Yoga Rowing Exercise:

a. Instructions for Yoga Rowing Exercise:

  • Sit up with both legs extended straight out in front of you.
  • Extend the arms and have the thumbs facing up towards the sky, fingers extended forward and keep the elbows straight.
  • Lean back 20-30 degrees – Inhale. Then lean forward about the same distance and exhale.
  • Continue at a moderate pace.  

b. Duration for Yoga Rowing Exercise: 1-3 minutes.

c. Benefits of Yoga Rowing Exercise:

  • Opens up the Solar Plexus.
  • Promotes flexibility in hamstrings and hips.

d. Practice Tips for Yoga Rowing Exercise: Your knees may bend slightly but elbows should remain straight. Curl your toes back towards you to accentuate the stretch in the calves.  

2. Yoga Single Leg Extensions:

a. Instructions for Yoga Single Leg Extensions:

  • Sit up with both legs extended.
  • Raise your left leg. Hold your toes/foot with both hands. Begin Breath of Fire Breathing Exercise.
  • Switch legs halfway through the exercise.

b. Duration for Yoga Single Leg Extensions: 1-3 minutes / leg

c. Benefits of Yoga Single Leg Extensions:

  • Stretches the Sciatic nerve and hamstrings.

d. Practice Tips for Yoga Single Leg Extensions: If you can’t hold your toes, hold as far up your leg as you can and curl your toes back towards you. Your leg should be straight and you should try to sit up.  If you are just beginning your yoga practice, be careful not to over stretch and incur injury.

3. Yoga Bridge Pose: (also called Yoga Table Top Pose)

a. Instructions for Yoga Bridge Pose:

  • Raise yourself on your palms and feet keeping your torso parallel to the ground. You should be facing the sky. The feet are hip distance apart while the hands are shoulder width apart.  Your fingers point away from you.
  • Begin the Breath of Fire Breathing Exercise.

b. Duration for Yoga Bridge Pose: 1-3 minutes.

c. Benefits of Yoga Bridge Pose:

  • Helps the immune system.
  • Strengthens the arms and back.

d. Practice Tips for Yoga Bridge Pose: Press your hips upwards towards the sky and try to keep your back straight. Rest your head on your collar muscles.  For starters, take frequent breaks if the arms get tiered and then restart the pose again when ready.

4. Kundalini Yoga Stretch Pose: (Article: Illustration of Kundalini Yoga Stretch Pose)

Picture of Kundalini Yoga Stretch Pose

free illustrated kundalini yoga pose for core abdominal power


Picture of Beginner Kundalini Yoga Stretch Pose

free illustrated beginner kundalini yoga pose for core abdominal power

a. Instructions for Kundalini Yoga Stretch Pose:

  • Lie on your back.
  • Place your hands under your buttocks palms facing down (to support your lower back).
  • Raise your heels 6 inches, point your feet and toes away from you, raise your head slightly and stare at your toes.
  • Begin Breath of Fire Breathing Exercise.

b. Duration for Kundalini Yoga Stretch Pose: 1-7 minutes.

c. Benefits of Kundalini Yoga Stretch Pose:

  • Builds the Navel Center.
  • This exercise works on your Manipura Chakra (aka. Nabhi Chakra) which is the seat of willpower.  It is recommended to build this center early in your Yoga practice as it will give you the strength and character to see things through.

d. Practice Tips for Kundalini Yoga Stretch Pose: To modify this yoga pose you can do this position with your legs bent or do one leg at a time.  As a beginner, it may take you some time to develop your abdominal strength, but if you stick with this exercise it will go a long way in helping you develop this important area.

5. Kundalini Yoga Tuck Pose:

a. Instructions for Kundalini Yoga Tuck Pose:

  • Lie on your back.
  • Bend your legs and bring your knees towards your chest.
  • Wrap your hands around your knees, raise your head and bring your nose between your knees.
  • Begin Breath of Fire Breathing Exercise.

b. Duration for Kundalini Yoga Tuck Pose: 1-3 minutes.

c. Benefits of Kundalini Yoga Tuck Pose:

  • Works on the digestive system.

d. Practice Tips for Kundalini Yoga Tuck Pose: If your back of neck hurts it means your digestive meridians need work.  Often when starting a yoga practice, our weaknesses are exposed, look at this as an opportunity to get healthier and more fit.

6. Kundalini Yoga Eagle Pose:

Picture of Kundalini Yoga Eagle Pose

free illustrated kundalini yoga pose for aura and magnetic field

a. Instructions for Kundalini Yoga Eagle Pose:

  • Sit in Easy pose (cross legged simple, also called Sukh Asana).
  • Raise your arms out to the sides and up 60 degrees.
  • Curl your fingers in towards your upper palm (not quite, but like a fist) then point your thumbs up towards the sky.
  • Keep your head up and elbows straight.
  • Begin Breath of Fire Breathing Exercise.

b. Duration for Kundalini Yoga Eagle Pose: 1-3 minutes.

c. Benefits of Kundalini Yoga Eagle Pose:

  • Works on the Magnetic Field.
  • Increases the power of your presence.
  • Makes you charismatic.

d. Practice Tips for Kundalini Yoga Eagle Pose: Try to keep your arms up and elbows straight.  Don’t give up at the first sign of discomfort.  As you develop your yoga practice, try to hold this pose longer it will help develop your willpower and spirit, as a beginner don’t over do it.

7. Yoga Corpse Pose: (also called Shav Asana)

a. Instructions for Yoga Corpse Pose:

  • Lie on your back and have your arms out to your sides about six to twelve inches away from your body.
  • Turn your palms slightly upward.
  • Relax your body and breath.

b. Duration for Yoga Corpse Pose: 5 minutes.

c. Benefits of Yoga Corpse Pose:

  • Allows the body to consolidate the gains from the previous exercises.
  • Helps the body heal and rejuvenate itself.
  • Promotes relaxation and peace.

d. Practice Tips for Yoga Corpse Pose: Try to consciously relax your entire body.  Release all your tensions and worries and stay in the present moment as best you can.

This concludes the Beginner Morning Wakeup Kundalini Yoga Exercises.

7

3 Most Powerful Yoga Pranayamas and Kriyas – Golden Nugget Yoga Pranayama – Part 2

3 Most Powerful Yoga Pranayamas and Kriyas – Golden Nugget Yoga Pranayama – Part 2

In part 1 of the 3 Most Powerful Yoga Pranayamas and Kriyas Part 1 we discussed the Mother of all Pranayamas, the Kundalini Yoga pranayama, Sodarshan Chakra Kriya and detailed its impressive reputation for transforming the ordinary into the supreme.  In this second part of the series we will study a yoga pranayama exercise of equal worth, but not quite as celebrated or famous.  It is the little know gem called the Golden Nugget Yoga Pranayama.  It is less involved that Sodarshan Chakra Kriya and also far less demanding from the point of view of time, but don’t be deceived by its simplicity.  Golden Nugget Yoga Pranayama, in impact, is second to none and bestows heaps of blessings upon those who practice and master it.

All the guidelines for practicing pranayama presented in part 1, apply to the practice of this pranayama as well and you should read those first before attempting to practice Golden Nugget Yoga Pranayama.  In addition there are some more prerequisites before practicing the advanced version of Golden Nugget Yoga Pranayama and those should be met first as well.  As with Sodarshan Chakra Kriya, there are modified versions of Golden Nugget Yoga Pranayama and I will provide those also and explain how the progression should go.

Most Powerful Yoga

Golden Nugget Yoga Pranayama: 

Background:  Golden Nugget Yoga Pranayama traces its roots back to the Yoga Sutras of Mahayogi Pantanjali.  It is actually the 7th exercise of a master pranayama set for refining awareness and purifying the energetic body.  The first 6 pranayamas are presented in Brain Development and Enlightenment – Part II – Vitalize Energy (Kundalini).  From what I have researched, this pranayama seems to have been revived by the modern yoga master S. N. Tavaria, who learned it from his Guru, Swami Rama.  It is an integral part of his program for building awareness, in order to establish a path of communication between the individual and his Divine Nature that resides within.  You can get more information on his work at www.3srb.org.

Benefits of Golden Nugget Yoga Pranayama:  This pranayama is designed to purify the energetic body by dissolving blockages (granthis) caused by emotional debris and toxin buildup in the psychic channels (nadis).  It tones and cleanses all the digestive organs and markedly improves the entire digestive system.  The pranayama also works on the respiratory system and nervous system.  It builds core strength and power, but most importantly it’s goal is to burn up unresolved emotions stored in the subconscious mind.  Steady and sincere practice of Golden Nugget Yoga Pranayama, results in a significant refinement of awareness and a calm, peaceful, silent mind capable of connecting with the Divinity that lies within.

Beginners Golden Nugget Yoga Pranayama:  Sit up in Sukh Asana (any variation of cross legged – you can get more information on Sukh Asana in Silent Mind Meditation Program: Basic Meditations Ch 7).  Apply modified Jalandhara Bandha by bringing your neck back slightly and chin slightly in like a soldier at attention.  Now inhale deeply then exhale.  After complete exhalation, hold your breath out and do a false inhalation.  Meaning, simulate the process of inhalation without actually inhaling.  This will result in your abdominal muscles being pulled up and in under the rib cage.  Pull these muscles in firmly but do not strain excessively.  This is called Uddiyana Bandha (abdominal lock).  Hold for a few seconds (2 – 5) then gently release the locks.  Repeat inhaling, exhaling and applying Uddiyana Bandha and Jalandhara Bandha 2 more times for a total of 3 times.  Build up to 5 repetitions per day.

Intermeditate Golden Nugget Yoga Pranayama:  Follow all the directions above, except once you apply Uddiyana Bandha and modified Jaladhara Bandha hold the locks for 10 seconds, increasing by 5 seconds over time, till you finally are able to hold the locks with your breath held out for 40 seconds.  You are only to do 1 repetition a day.  This is the first requirement before moving ahead to the advanced version.  The second requirement is that you have been regularly practicing the Pranayama Set for Vitalizing Kundalini given in Brain Development and Enlightenment Part II – Vitalize Energy (Kundalini) for at least 6 months at the full 3 minutes / exercise.  Only then should you attempt to do the advanced version of Golden Nugget Yoga Pranayama.

Advanced Golden Nugget Yoga Pranayama:  As indicated earlier this is the 7th exercise of the series Pranayama Set for Vitalizing Kundalini.  So you should do the 6 exercises as described and then do Golden Nugget Yoga Pranayama immediately after.  In the advanced version you will follow the description given above for the intermediate level and then after 40 seconds of breath held out, with Uddiyana Bandha and Jalandhara Bandha still in place, you should start modified Breath of Fire.  Breath of Fire is very fast shallow breathing through the nose like fast sniffing and in this case you should try to restrict the breath to just the upper chest area.  The duration for holding Uddiyana Bandha and Jalandhara Bandha together with doing Breath of Fire is 2 minutes and 20 seconds.  So the total time for this pranayama will be 3 minutes – 40 seconds of Uddiyana Bandha and Jalandhara Bandha with breath held out, followed by 2 minutes and 20 seconds of Uddiyana Bandha and Jalandhara Bandha with restricted Breath of Fire.  It is only to be done 1 time daily.

Design of Golden Nugget Yoga Pranayama:  Here is an analysis of the various components of this pranayama and their affects.

  1. Uddiyana Bandha massages all the digestive organs and forces them to expel toxins and waste matter into the elimination pathways of the body.  Uddiyana Bandha also builds your abdominal muscles giving you core strength and power.  This bandha activates the 3rd Chakra, called the Manipura or Nabhi Chakra, which is responsible for the wellbeing of your digestive organs and for the traits of willpower and character.  Thus, this Bandha helps develop these attributes.  It is also great for building six pack abs ;-).
  2. Holding your breath out, causes the nervous system to contract, but then when you breathe in, it expands past the point it was at when you started.  Thus, this aspect of the pranayama, helps your nervous system grow in strength and capacity.
  3. The Breath of Fire, done in conjunction with Uddiyana Bandha, burns up toxins as they are released, thus cleansing and clearing the system and pathways of debris.  This debris is a reflection of unresolved emotional garbage and freeing your system of it clears the blockages (grathis) in the psychic channels (nadis) that prevent the flow or vital air (prana) and vital energy (Kundalini Shakti).  Once cleared, greater amounts of prana can be absorbed by the energetic (chakra) body and greater amounts of Kundalini Shakti can flow though your system leading to higher levels of being and consciousness.

In the next part, of the 3 Most Powerful Yoga Pranayamas and Kriyas Series, we will discuss a yoga pranayama emerging from the world renowned Yoga school of Swami Satyananda Saraswati.

8

Kundalini Yoga Set: Morning Wakeup Series

Kundalini Yoga Morning Wake-up Set

Yoga Reference: Yoga Sets:

The following Yoga set comes from the ancient science of Kundalini Yoga.  This Kriya (set) is one which encompasses many of the daily recommendations of Kundalini Yoga. It can be done anytime of the day although it is best done in the early morning hours.  The Pranayam (breathing exercise) used for most of this set is the Breath of Fire, which is described first.  The exercises below it, should be done in sequence without taking a break in between if possible.  Before practicing this set please read the 10 Guidelines for Kundalini Yoga Practice post first. 

This set is ideal for beginning a Kundalini Yoga practice and done regularly can help form a very good base from which to progress to more advanced work.  It is also suitable for doing prior to a meditation session.  In addition, this set has the advantage of not requiring much time so can be perfect for those with a busy schedule.  Overall, the set works on your respiratory, digestive, immune and nervous systems.

Kundalini Yoga

Breath of Fire:

a. Description: Breath of Fire (BOF) is rapid breathing through the nose with equal emphasis on the inhalation and exhalation- like very fast sniffing.  Keep the abdomen relaxed and allow it to pulse automatically with the breath.  Remember that the breath is not taken in very deep and the pace is fast, about 3 cycles per second.

b. Breath:  Breath of Fire

c. Duration: As described below per exercise

d. Benefits: Breath of Fire is the breath to do when you want to increase your energy and quickly oxygenate your blood.  It generates heat it the body, helps detoxify your system and brings your entire system under one rhythm.

e. Notes: If you feel dizzy slow down the force and/or speed at which you are doing the breathing.  Or you can substitute Long Deep Breathing for BOF until you feel ready to switch to BOF again.

1. Modified Rowing: Sit up with both legs extended straight out in front of you. Extend the arms and have the thumbs facing up towards the sky, fingers extended forward and keep the elbows straight. Lean back 20-30 degrees and then lean forward the same distance. Continue at a moderate pace.  

a. Breath: Inhale back – Exhale forward

b. Duration: 1-3 min

c. Benefit: Opens up the Solar Plexus and promotes flexibility in hamstrings and hips.

d. Notes: Your knees may bend slightly but elbows should remain straight. Curl your toes back towards you to accentuate the stretch in the calves.  

2. Single Leg Extension: Sit up with both legs extended.  Raise your left leg. Hold your toes/foot with both hands. Switch legs.

a. Breath: Breath of Fire

b. Duration: 1-3 min / leg

c. Benefit: Stretches the Sciatic nerve and hamstrings.

d. Notes: If you can’t hold your toes, hold as far up your leg as you can and curl your toes back towards you. Your leg should be straight and you should try to sit up.

3. Bridge Pose: Raise yourself on your palms and feet keeping your torso parallel to the ground. You should be facing the sky. The feet are hip distance apart while the hands are shoulder width apart.

a. Breath: Breath of Fire

b. Duration: 1-3 min

c. Benefit: Helps the immune system.

d. Notes: Press your hips upwards towards the sky. Rest your head on your collar muscles.

4. Stretch Pose: Lie on your back. Place your hands under your buttocks palms facing down (to support your lower back). Raise your heels 6 inches, point your feet away from you, raise your head slightly and stare at your toes.

a. Breath: Breath of Fire

b. Duration: 1-7 min

c. Benefit: Builds the Navel Center.  This exercise works on your Manipura Chakra (aka. Nabhi Chakra) which is the seat of willpower.  It is recommended to build this center early in your Yoga practice as it will give you the strength and character to see things through.

d. Notes: To modify you can do this position with your legs bent or do one leg at a time.

5. Tuck Pose: Lie on your back.  Bend your legs and bring your knees towards your chest.  Wrap your hands around your knees, raise your head and bring your nose between your knees.

a. Breath: Breath of Fire

b. Duration: 1-3 min

c. Benefit: Works on the digestive system.

d. Notes: If your back of neck hurts it means your digestive meridians need work.

6. Eagle Pose: Sit in Easy pose (cross legged simple, also called Sukh Asan). Raise your arms out to the sides and up 60 degrees. Make a fist then point your thumbs up towards the sky. Keep your head up and elbows straight.

a. Breath: Breath of Fire

b. Duration: 1-3 min

c. Benefit: Works on the Magnetic Field

d. Notes: Try to keep your arms up.

7. Corpse Pose:  Lie on your back and have your arms out to the sides about six to twelve inches away from your body with the palms turned slightly upwards.  This posture is also called Shav Asan.

a. Breath: Relaxed

b. Duration: 5 min

c. Benefit: Allows the body to consolidate the gains from the previous exercises.

d. Notes: Try to consciously relax your entire body.

9

Brain Development and Enlightenment Part II: Vitalize Energy (Kundalini)

Brain Development & Enlightenment Series: Vitalize Energy (Kundalini)

Art of Meditation: Brain Development & Enlightenment Part 2 of 3:

In Part 1 of this series we indicated that the natural state of the organism is one where all the internal systems were working at peak capacity. We spoke of how refining the senses, vitalizing energy and sharpening awareness and intelligence were the keys to the completion of this process. In Part I we also provided some specific meditations to help develop the most important (meditation related) senses of hearing and seeing. In this article we will delve into vitalizing energy (kundalini).

Brain Development

Vital energy is required for, not only optimal health, but also for doing the meditations that finally hone intelligence and awareness (discussed in Part 3 of this series). There are two primary sciences for building this energy, yoga (the use of physical postures (asanas), body locks (bandhas) and motion), and pranayama (the science of breath). In this article we will provide a very powerful and complete pranayama set which, when done consistently, can remarkably increase and awaken energy. For those familiar with Kundalini and the Chakra system I will provide the details of how each pranayama exercise works with regard to the charkas. If you are not familiar with this framework not to worry, the set will work for you just the same (and you can familiarize yourself with this topic, if you like, by visiting the Kundalini Yoga category). For this article it is sufficient to think of Kundalini as the total energy of man. Kinetic Energy, which is already active and flowing and Potential Energy that lies within waiting to be awakened.

More information on this set and 3SRB is available on the website www.3srb.org and this work has been transmitted to us by the great modern Yoga master S. N. Tavaria. 

Below is the detailed description to channel & release these energies:–

Preparation:

  1. The sitting positions for the set can be cross legged (Sukn Asana) or on a chair (refer to the Silent Mind Meditation Program Chapter 4: Yoga for Meditation for more details on these postures if required)
  2. Starting time for each pranayama exercise is 15 seconds; build up to 3 minutes per exercise.
  3. All the pranayamas should be done one after the other with no rest in between if possible.
  4. The rhythm for the breathing is 36 cycles per minute where specified. The exercises normally are done to music, which provides this correct rhythm of 36 cycles per minute. In the event you do not have this music, use a stopwatch or other time device to set the pace of your breathing correctly.  If you are using a time device it helps to break it down to 18 cycles / 30 seconds to help keep the correct pace.

Pranayama Set For Vitalizing Kundalini

Begin:

Exercise 1: Chest Pump Pranayama: Place both hands on the center of the chest one on top of the other palms facing in; relax the elbows. Begin breathing deep and fast limiting the breath to the chest area only. The breath should be in rhythm and at a pace of 36 cycles / minute.

Benefits: Works on the Lungs and Heart. The pranayama improves lung capacity thus allowing intake of more of that magical ingredient prana (the life giving and vital aspect of air). It also helps blood flow and circulation by working on and improving the heart. This is also the region of the energy vortex (charka) called the Anahat Chakra, which is responsible for the flow of that divine energy called Love.

Exercise 2: Navel Pump Pranayama: Place both hands above the navel one of top of the other palms facing in. Begin breathing deep and fast limiting the breath to the abdominal area. The breath should be in rhythm and at a pace of 36 cycles / minute.

Benefits: The pranayama works on optimizing the digestive system and all associated organs in that region. Both absorption and excretion are improved. The Nabhi or Manipura Chakra governs this region, which is the seat of Willpower. Work on this region balances the organism providing it a calm strength and ability to sustain difficult activity over time.

Exercise 3: Full Pump Pranayama: Sit with legs extended, keeping knees straight and hold as far down the legs as possible while keeping the back straight. Holding the toes is ideal. Begin breathing deep and fast allowing it fill both the chest and abdominal cavity. The breath should be in rhythm and at a pace of 36 cycles / minute.

Benefits: This posture along with the pranayama promotes healing, longevity and flow. It stretches the longest nerve in the body (the sciatic nerve) along with stretching the entire backside of the body. It elongates the spine and frees it of blockages and insures proper flow of energy up and down the vital channels that run in and along the spine (sushumna, ida and pingla). The lower 2 chakras (Muladhara and Swadisthan) are activated and balanced by this exercise, which relate to our grounded and creative natures respectively.

Exercise 4: Staccato Breathing Pranayama. In this pranayama you will partition the breath into 5 short, successive inhalations through the nose, filling the lungs completely, to make one complete inhalation, then release the breath forcefully via the mouth in one exhalation. In other words, one 5 part inhalation through the nose, followed by a single explosive exhalation through the mouth.

Benefits: This pranayama dramatically increases lung capacity and elasticity and improves blood circulation. The partitioned breathing is key in increasing lung capacity for we seldom use our full lungs when taking a single breath. This exercise is also very potent in increasing the overall strength of our nervous system.

Exercise 5: Segmented Breathing Pranamaya. In this pranayama you will inhale slowly for 5 seconds, hold breath for 5 second, exhale slowly for 5 seconds and hold again after exhalation for 5 seconds before repeating the cycle. In other words each portion inhalation, hold, exhalation, hold should take 5 seconds so 1 complete cycle takes 20 seconds.

Benefits: This pranayama works to calm the entire organism including brain function. It helps to break down the pattern of the constantly reactive mind and ignite insight by teaching the system to be still and behold.

Exercise 6: Neck Lock (modified Jalandhara Bandha). Sit up straight, take a deep breath hold, pinch the nose shut with thumb and index finger and apply Jalandhara Bandha (neck lock). Neck lock is applied by bringing the chin down to the hollow of the throat and with free hand pressing down gently on the top, back of the head. Once in the position swallow as in the act of drinking 5 times and then release, lower your hands and raise your head. Take another deep inhalation, hold and repeat exercise.

Benefits: The exercise works to sharpen all the senses. Also works on the thyroid, parathyroid and pituitary glands thus improving all the related functions for these critical glands. The throat is the seat of the Vishuddhi Charka, which is responsible for our communication as well as our thinking. Thus working on this chakra gives you power over speech and improves your brain function.

End: Pranayama Set for Vitalizing Energy Kundalini

This pranayama set above has its roots in Sage Pantajali’s Yoga Sutras and from the research I have done it has been revived and explained by S.N. Tavaria, a modern master of Yoga. This set is a rare gem. It is very complete, does not require all day to do and most importantly the pranayamas are very effective in refining and optimizing your critical physiological systems at many levels. It has numerous health benefits but for those interested in the science of enlightenment, this set helps turbo charge the entire system and prepare it for the next stage. Having vitalized Kundalini energy, we are now ready for the next and most important requirement, which is to sharpen awareness and intelligence to promote insight. In the next part of the series I will cover this work, but before that I would like to provide some comments and helpful hints regarding the above set.

Hints and Comments:

1. Do it regularly! I can’t emphasize that enough. This pranayama set is going to radically change you physically, but needs to be done consistently to bestow its affects. If you are doing 1-2 minutes / exercise you can do the set twice a day. If you are doing the full 3 minutes / exercise only do the set once a day.

2. Don’t try to do more than you are comfortable with. Take your time building up. If you push too hard you may find yourself resisting doing the set daily and that will be counter productive.

3. Drink plenty of water after doing the pranayamas as it helps wash out any toxins that were released into the blood stream.

4. Before doing the pranayamas stretch a little. Especially your hamstrings for exercise #3 and more so if you plan on practicing it in the morning, when the body tends to be stiffer.

5. Don’t eat at least 1-2 hours prior to doing the set.

6. While doing the pranayamas remain as attentive as possible of the present moment, try not to wander off mentally.

_______________________________________________________________________

Internet Resources for Brain Development, Meditation, Kundalini Yoga, Health and Wellbeing, and Personal Development:

Thanks to Lynn for selecting Brain Development and Enlightenment Part II: Vitalize Energy (Kundalini) to be a part of the Carnival of Natural Health.  Head on over to Medicinal Herbs for other great stuff on natural healing.

_______________________________________________________________________